Tip: Right click on the banner blow and open it into a new windows or tab.

Repairing and Upgrading Your PC by O'Reilly Media

Showing posts with label LINUX. Show all posts

September 29, 2009

Wine 1.1.30 released

Wine
The Wine development release 1.1.30 is now available. With Wine it's possible to run Windows applications on top of Linux.
Wine
What's new in this release:
  • Support for OpenAL.
  • Many improvements in HTML and JavaScript support.
  • Many common controls fixes and improvements.
  • More Direct3D 10 work.
  • Better MAPI support.
  • Various bug fixes.

The source is available from the following locations:

http://ibiblio.org/pub/linux/system/emulators/wine/wine-1.1.30.tar.bz2
http://prdownloads.sourceforge.net/wine/wine-1.1.30.tar.bz2

Binary packages for various distributions will be available from:

http://www.winehq.org/site/download

You will find documentation on http://www.winehq.org/site/documentation

You can also get the current source directly from the git
repository. Check http://www.winehq.org/site/git for details.

Here you can read the complete release info of the 1.1.30 release.

September 26, 2009

C++, the GPU, and Thrust: Sorting Numbers on the GPU

Version 1.0 of Thrust was released in May 2009 and is available under the Apache License version 2.0. There is a NOTICE file which also contains the Boost license and a small paragraph by Hewlett-Packard Company. So it appears there is really a mixture of open source licenses applied to the Thrust library. Thrust is completely implemented in header files, so installation for development consists of downloading the zip file and expanding it somewhere.
Fedora 11 ships with gcc version 4.4. Unfortunately, at the time of writing, the current CUDA release did not support gcc version 4.4. To get around this you'll need to install a 4.3.x or lower version of gcc and modify your CUDA installation to use the older gcc. To get an older gcc, you could yum install compat-gcc-34 and then apply the changes below. Note that only the gcc34 directory and the links contained within are required if you are not planning on compiling the examples from the CUDA SDK.
$ mkdir ~/gcc34
$ ln -s /usr/bin/gcc34 ~/gcc34/gcc
$ ln -s /usr/bin/g++34 ~/gcc34/g++

$ su -l
# cp -av /usr/local/cuda/sdk/common/common.mk /usr/local/cuda/sdk/common/common.mk.original
# vi /usr/local/cuda/sdk/common/common.mk
...
CXX        := g++34
CC         := gcc34
LINK       := g++34 -fPIC
...
NVCCFLAGS := --compiler-bindir ~/gcc34
The below code is based on the first example from the Thrust website with additions to show the input and sorted output on standard error. Notice that there is a host_vector and device_vector, these represent std::vector like containers which use the main memory and VRAM respectively. The thrust::sort() call with transfer control from the CPU to the GPU and the sort will be processed on the graphics card. Once the sort is complete, execution will begin again on the CPU at the line after thrust::sort() call. As the second last line of main() shows, you can directly access an element from the device vector from code running on the CPU, but as it involves accessing the VRAM from the CPU it will be a slow operation. It is faster to copy the whole device vector back into main memory (a host vector) before iterating over its elements.
You can clearly see the host and device (RAM and VRAM) vectors used in the code to move the input and output data around. You might be wondering where are these kernel functions that were mentioned in the introduction of the series. The closest you get to one in this example is the invocation of thrust::sort which provides the same functionality as std::sort. While the outcome is the same, thrust::sort compiles its code to work on the GPU, in particular a version of thrust::less is used for element comparison.
#include 
#include 
#include 
#include 
#include 

#include 
#include 

int main(void)
{
  // generate random data on the host
  thrust::host_vector h_vec(20);
  thrust::generate(h_vec.begin(), h_vec.end(), rand);
  std::cerr << "input..." << std::endl;
  std::copy( h_vec.begin(), h_vec.end(), std::ostream_iterator(std::cerr, "\n") );
  std::cerr << "" << std::endl;

  // transfer to device and sort
  thrust::device_vector d_vec = h_vec;
  thrust::sort(d_vec.begin(), d_vec.end());

  // show result
  thrust::host_vector h_result = d_vec;
  std::cerr << "output..." << std::endl;
  std::copy( h_result.begin(), h_result.end(), std::ostream_iterator(std::cerr, "\n") );
  std::cerr << "" << std::endl;

  std::cerr << "third item in sorted data:" << d_vec[2] << std::endl;

  return 0;
}
So the in program above, the thrust::sort line will execute on the GPU, accessing the device_vector d_vec and sorting it's contents.
The commands below will compile and run the above example. Assuming CUDA is already installed on the machine. If your Linux distribution does not use gcc 4.4 then you can leave out the compiler-bindir argument to nvcc. CUDA programs have the extension .cu instead of .cpp. The gcc compiler is not invoked directly to compile a source file which uses CUDA, but the nvcc executable is used, which itself uses gcc behind the scenes.
$ nvcc --compiler-bindir ~/gcc34   website-example.cu -o website-example
...
$ ./website-example 
input...
1804289383
846930886
1681692777
1714636915
1957747793
424238335
719885386
1649760492
596516649
1189641421
1025202362
1350490027
783368690
1102520059
2044897763
1967513926
1365180540
1540383426
304089172
1303455736

output...
304089172
424238335
596516649
719885386
783368690
846930886
1025202362
1102520059
1189641421
1303455736
1350490027
1365180540
1540383426
1649760492
1681692777
1714636915
1804289383
1957747793
1967513926
2044897763

third item in sorted data:596516649
The program shown below is the first benchmark, comparing an NVidia 250 GTS card with an Intel Q6600 for sorting a vector of numbers. Both integer and floating point numbers are tested to see what performance impact there is using wider data types with a floating point less than operation.
The main() function simply calls the bench() template function with a specific numeric type and the size of the vector to use. Note that the only thing that the program does differently in order to use the GPU for the sort is copy the vector into a device_vector, use thrust::sort() instead of std::sort(), and copy the device_vector back to the main memory of the machine. The Benchmark class starts a timer whenever an object is created and stops the timer before printing the interval whenever an object is destroyed. It is used in a Resource Acquisition Is Initialization (RAII) design pattern where the object scope determines when the benchmark is started and stopped.
#include 
#include 
#include 
#include 
#include 

#include "bench.hh"

template < class T >
void bench( const std::string& n, const int SZ )
{
    cerr << "-------------" << endl;
    cerr << "bench() " << n << " SZ:" << SZ << endl;
    
    Benchmark dbm("bench function total....");
    thrust::host_vector h_vec( SZ );
    thrust::generate(h_vec.begin(), h_vec.end(), rand);

    // transfer to device and sort
    {
        Benchmark dbm("GPU process and copy-to-and-from-device");
        thrust::device_vector d_vec;
        
        {
            Benchmark dbm("GPU process and copy-to-device");
            d_vec = h_vec;
            {
                Benchmark dbm("GPU process");
                thrust::sort(d_vec.begin(), d_vec.end());
            }
        }
        
        thrust::host_vector t = d_vec;
        T xx = t[3];
    }

    // sort on host, CPU only.
    {
        Benchmark dbm("CPU only process");
        std::sort( h_vec.begin(), h_vec.end() );
    }
}

int main(void)
{
    bench( "int",          1 * 1000 );
    bench( "int",         10 * 1000 );
    bench( "int",        100 * 1000 );
    bench( "int",       1000 * 1000 );

    bench( "double",          1 * 1000 );
    bench( "double",         10 * 1000 );
    bench( "double",        100 * 1000 );
    bench( "double",       1000 * 1000 );
    
    return 0;
}
The results of the above program for integer vectors is shown below. Both axis are on logarithmic scales, the X-axis showing the vectors from one thousand to one million elements, the Y-axis recording runtime. The blue line represents time for the GPU to sort the vector from VRAM. The red line includes both the GPU processing time (blue line) and the time taken to transfer the vector between main memory and VRAM and back again. The purple line is the time taken by the CPU to sort the vector (std::sort).
By the time your vector contains 10,000 elements, using the GPU is faster overall, but only slightly. Notice that the GPU doesn't change a great deal between 1,000 and 1,000,000 elements. This seems to indicate that the parallelization offered by thrust::sort has not hit the limits of the GPU hardware at a million elements. Performance wise, once your vector has a million elements, using the GPU is about 10 times faster! Not a bad return for changing a few lines of C++ code.

Sorting a vector of floating point numbers is shown below. This gives very similar results to sorting integers; a crossover at 10,000 elements where using the GPU becomes more attractive for sorting and at a million elements the GPU is about 10 times faster.

I created a small program to test the performance of copying memory between main memory (memcpy), from main memory to VRAM, from VRAM back to main memory, and between two VRAM buffers. The later three use cudaMemcpy() to perform the copy. The benchmark performs 100 copies using blocks of memory ranging from 100,000 to 100,000,000 bytes. The timings for copies from VRAM to VRAM are left off the graph because they were all below 4 milliseconds. The times for main memory to main (blue), main to VRAM (red), and VRAM to main (purple), are shown below. Note that both axis use a logarithmic scale. Although copying to VRAM was slower than copying to main memory, it was not by a huge factor. Copying back from VRAM to main memory was slower, perhaps because most games only send data to the graphics card.

Tune in next time when we'll take a look at sorting vectors of strings instead of numeric types.

Helpful Tools for Software Developers

When software developers get together, chatter quickly turns to shop talk. Developers regale one another with tales of hair-pulling bugs, demanding clients, cheap hardware, and fantastic hacks. Conversation includes esoteric debates, too: the advantages of one processor versus another, or the aesthetics of indentation. There’s even proselytizing: Emacs or vi? Mac or not Mac? RMS: angel or devil? And of course, no professional gathering would be complete without a discussion or three about the tools of the trade. Indeed, of late, there seems to be a veritable explosion of great tools for developers. The ubiquity of the Web has democratized the marketplace for such tools, but Web application development is sufficiently refined that propping up a new product online is quite tractable and inexpensive. Moreover, leasing an online service such as Github is cheap compared to purchasing licenses, installing software, and maintaining internal servers. And, in a boon for developers, the cost of switching from one online service to another is relatively slight. All things combined, these are heady days for software developers.
This week, I list some of my favorite software development tools. There are the usual suspects: an editor and a debugger, but I also highlight some tools that are far less technical but no less vital to the job.
Operating systems
Since this is Linux Magazine, it’s no shock that I consider Linux essential for the job. Virtually every tool and package is available on the platform, and since much of the software I use originates on Linux, its my canonical reference for operation. A bug in a Linux package installed via apt-get likely means the bug exists on all platforms. Software installation is also a snap, the source to every utility and library is readily available, and hosting is cheap. For software development, there is no equal.
However, coding is often just a fraction of the time developers spend on software development. There’s project management, reporting, email, documentation, billing, and more. Linux offers some solutions, but the king of productivity platforms is the Mac. From email to drawing tools such as OmniGraffle, the Mac is my preferred platform for daily work. On its surface, the Mac offers rich and GUI applications; at its heart, it’s a FreeBSD system that operates identically to my Ubuntu server.
I have a suite of preferred tools on the Mac. Parallels runs virtual instances of Linux and Windows on my Intel-based MacBook. Navicat, Seequel Pro, and MySQL Workbench peer into MySQL. Navicat is a power tool, but I find the minimal Seequel Pro more convenient of late. OmniGraffle creates diagrams and wireframes with ease and has no equal on any platform. And Textmate and BBedit are permanent denizens of my Dock. Textmate is incredible for Rails coding, but I prefer to write HTML and text documents in BBedit. I also run lots of little gems: PTHPasteboard Pro minatains a near-limitless less of clipboards; Teleport lets me use one mouse and keyboard to span a desktop full of Mac machines; and Billings keeps track of my billable hours.
I also find the new debugging tools in Safari 4 to be quite good. The Web Inspector benchmarks Web page download performance and can even debug JavaScript, although Firebug is more transparent.
Debuggers
Speaking of Firebug, it is my preferred tool for debugging client-side Web application code. I suppose it would be more correct to recommend Firefox, since Firebug is simply an extension. The third-party add-ons and extensions make Firefox a hands-down winner for application development. Y!Slow provides insight on non-performant Web pages, and SenSEO not provides similar metrics for search engine optimization (SEO) benchmarks. Just point SenSEO at a page and it advises how to improve the metadata accessible to the search engines.
On the server-side, I prefer debuggers over printf and inspect statements. Both irb and rdebug suffice for Ruby development, while embedded debugger calls help to debug Rails applications running under the standard Rails Web server. Stalwart gdb tackles C.
Related to bugs, I currently use Lighthouse to track bug reports. One of its advantages is the email gateway: Others and I can submit new tickets, make amendments, and track progress all via email. Other tracking software, including Jira, also provide email portals, but this feature and the simplicity of the Lighthouse user interface. Another option is Sifter, which features an even more attractive and approachable user interface. Prices are comparable: each is around $20 per month for a few projects, disk space, and seats.
Software Services
Lighthouse and Sifter are just two of many services now available online. Task management is the strong suit of Basecamp and a similar tool named Redmine. Basecamp is free or cheap and great for project management. It too features an email gateway: replies to certain messages are automatically appended to ongoing conversations.
Gthub and Beanstalk provide Git and Subversion hosting, respectively. I continue to use Git from the command-line, but I’ve switched to Versions on Mac OS X to interact with Subversion. Both version control systems seem popular, with some projects on one or the other. I suspect I use Git more, simply because its cool among Ruby aficianados, and its operation is something of an analog to traditional utilities like mv, rm, and the ancient Revision Control System (rcs) found on Unix systems back in the day.
Glancing at my bookmarks, I also use Twitter to follow projects, companies, and people. The advantage of Twitter and a Twitter client like Adium or TweetDeck is the immediacy: its flags a tantalizing message for me. I often forget to catch up on my RSS Feeds (read via NewsFire), so Twitter is an adequate substitute for instant updates. Many lay people use Twitter; others do not get it. For me, Twitter is an essential channel for me; otherwise, I’d miss a lot of important patches, releases, and security alerts.
And Lots More
I typically write about my arsenal of tools in this column. Recent entries included articles on Sunspot for search, Typekit for better fonts, and CSS frameworks to jump start Web page development. In no specific order, here are other favorites I am tinkering with now.
  • Eliot Horowitz wrote about MongoDB this week. I’ve applied it to store everything from email messages to user profiles, two examples of data that can vary in size and content. MongoMapper is an ActiveRecord-like interface to MongoDB for Rails applications and I highly recommend it. Mongo drivers and software is also available for Java, Python, and PHP, too, at a minimum. I will write about MongoMapper next week.
  • JQuery is my preferred JavaScript Ajax library. jQuery is powerful and quick to learn. I do wish at times that JavaScript was not the only language that ran in the browser—but multilingual browsers seems like a Pandora’s Box.
  • Stack Overflow is a great place to post questions and provide answers to assist your fellow geek. Each correct answer you post earns you some street cred and karma. If you’re in a jam, post here and look for a suitable Google Group for your topic. You should also consider IRC. Yes, it’s old school, but if lots of others are online, a quick chat can also provide a solution to some vexing issue in the middle of the night.
Proper Fuel
Finally, developers need proper fuel. Some run on cola, others on coffee, and still others on microbrews. My power source of choice is Thai food. With it, I can code and play the keyboard like Linus and Linus, that is Torvalds and Van Pelt, respectively.
If you have a favorite fuel or an application you cannot live without, drop me a line. I’d love to hear about it.

Free and Open Source 2D Animation Software for Linux

After featuring some of the best Free and Open Source 3D animation software, it's time to take a look at some 2D computer graphics program for Linux users who are into creating two-dimensional models. These free 2D animation software is as capable as those that are commercially available so do take time to try them first before emptying your wallet.

Here are a few Free and Open Source 2D animation software for Linux that you may like:


Synfig
Synfig is a 2D vector graphics and timeline-based computer animation program that was originally the custom animation platform for the now discontinued Voria Studios. The main goal of the project is to create a program that is capable of producing "feature-film quality animation with fewer people and resources." The program offers an alternative to manual tweening so that the animator doesn't have to draw each and every frame. Synfig is capable of simulating soft-shading using curved gradients within an area so that the animator doesn't have to draw shading into every single frame.

Learn more about Synfig HERE


KToon
KToon is a 2D Animation Toolkit designed by Toonka Films animators for aspiring animators. It is designed to function in a similar way to popular proprietary animation packages, like Macromedia Flash. It currently lacks a scripting language like Macromedia's ActionScript, but it can export movies as AVI files and Flash animations. KToon uses OpenGL and Qt toolkit as programming resources.

Learn more about KToon HERE


Pencil
Pencil is a drawing and 2D animation software that is written in C++ and is based on QT. It uses a unique bitmap/vector drawing interface to produce simple 2D graphics as well as animation. Pencil is also available for Windows, Mac, and BSD.

Learn more about Pencil HERE


If you know of other free and open source 2D animation software that I failed to include here, please share them with us via comment.

September 25, 2009

10 Things New About Ubuntu Karmic Koala Worth Taking Note Of

Yet another major Ubuntu release is on the anvil. It is called Ubuntu 9.10 codenamed Karmic Koala. There is nothing really to get excited about this new release to be frank. And probably no major changes to the user interface. Canonical had promised major changes to the UI for Ubuntu 8.04 Hardy Heron, but even after two more major releases now, no upgrades have shown up yet. Lets take a look at the list of changes with this new Karmic release.
Ubuntu One File Sharing Service
  • Ubuntu Karmic Koala comes with Ubuntu one file sharing service as default. Ubuntu one is a file synchronisation service and also a network storage service.

New Community Contributed Themes
  • A bunch of new community contributed thems are also on the way and hopefully will make its cut into new Ubuntu Karmic. They include four really good themes and two icon sets.

Grub 2 by Default
  • Grub 2 is completely rewritten from scratch, includes a lot of improvements like cross-platform installation which allows for installing Grub from a different architecture, portability for various architectures etc.
  • Grub 2 is the default boot loader for new installations of Karmic, replacing the previous Grub Legacy boot loader. Existing systems will not be upgraded to GRUB 2 at this time, as automatically reinstalling the boot loader is an inherently risky operation.
New GNOME
  • Gnome 2.28 will come as default and you could even get a chance to test Gnome 3 in Ubuntu Karmic. Here is a quick preview on what actually Gnome 3 would be like. (pretty nice). [ Video Courtesy: Gotbletu ]

New Login Window
  • New 'not that bad' login window. It may not look exactly like this, but this will give you an abstract idea. You may also want to check out 20 other exceptional looking GDM themes available out there. 

 [screen shot courtesy: OMGUbuntu ]
New Splash Screen
  • A lot improved splash screen.

Better Looking Networking Manager
  • Small changes like these does matter. What do you think.   

Empathy as the default IM Client
  • IM Client Empathy is going to replace Pidgin as the default IM Client for Ubuntu 9.10. There is a lot of discussion going around on this change, but i think it is not a bad decision after all. 
New Linux Kernel
  • The newest Linux Kernel 2.6.31 will be included in which even constitutes USB 3.0 support (WOW!) and a whole lot of other improvements. 
Faster Boot Times
  • New Ubuntu Karmic comes with still faster boot times. That is a welcome development and lets hope, sooner than later, boot time will reach sub 10 second levels. In my case boot up time is an atrocious 40-45 seconds now.

September 11, 2009

Create a Web-based Photo Gallery in a Jiffy with GMFoto

Looking for a quick and easy way to set up a Web-based photo gallery? Consider GMFoto. This application lets you create a snazzy Web-based photo album literally in a matter of minutes.

Unlike many popular photo gallery applications, GMFoto doesn't use a database back-end, so it's dead-simple to install and configure. Grab the latest version of the application and unpack the downloaded archive into a directory (e.g., gmfoto). Now open the code/code.index.php file in a text editor and replace the loveunit_com string with the name of the resulting directory (in this case, it's gmfoto). Do the same in the index.php file in the user/00000 directory. The user/00000 directory also contains the settings.php file which you can use to tweak the gallery's settings. Here you can specify a gallery name and description, keywords, a Google Analytics account ID, a gallery skin, and thumbnail sizes.

Once GMFoto is configured, move the entire gmfoto directory into the document root of your server, and copy the folders containing photos to the user/00000 directory. Point your browser to http://yourserver/gmphoto/user/00000 and behold the gallery generated by GMFoto. Note that it may take a while for GMFoto to generate thumbnails for the photos, so you may have to wait a bit for the gallery to appear in the browser.

GMFoto supports multiple users (it comes with two default user directories: 00000 and 00001). If you want to add a new user, simply clone the entire 0000 or 0001 directory and edit the index.php file as described above.

GMFoto is not the most advanced photo gallery software out there, but if you need to turn your photo collection into a slick photo album with a minimum of effort, this application will do the trick just fine.

September 9, 2009

Wine Linux and Multimedia Software


I have been an unashamed Windows user for longer than I care to remember. However, I took a big step about six months ago when I commenced my adventure with Linux. This was partly triggered because I was curious to learn more about the operating system I was reading so much about on technology websites. Moreover my then operating system, Vista, was becoming increasingly irritating to use. Vista's User Access Control had annoyed me from the outset, but this was only one of many problems haunting me on a daily basis, not least the constant reboots, and security issues.
Installing Ubuntu was easy, with all of my hardware being automatically detected including my laser printer. I was immediately impressed with how simple everything is to use. Some of the software that I used under Windows is also available under Linux. Skype, FireFox, and OpenOffice are three of my most frequently used applications, and the transition to Linux for these applications was painless. However, there remained one significant barrier to becoming productive under Linux. Unfortunately, the developers of many of my favorite Windows software have decided not to release a Linux version. Whilst there are Linux alternatives for many of these applications (some of which, no doubt, are just as good or in fact even better than what I had been using in the Windows world), this did not alter the fact that I would need to learn how a large set of new software worked. Do not get me wrong, I love experimenting with fresh software. But to be faced with having to learn about so many new applications simultaneously was a bit daunting.
In a roundabout way, this brings me on to the subject of this article, which is the Wine software. This is an open source implementation of the Windows Application Programming Interface on top of X, OpenGL, and Linux. I am not exactly sure what this means, but in plain English, it means that Wine is a compatibility layer between Windows programs and Linux. When running a Windows application with Wine, the software actually believes it is running under Windows. The name is derived from the recursive acronym, Wine Is Not an Emulator.
By way of background, the Wine project started way back in 1993. However, it was not until 2008 that a stable release of Wine was finally released. There are not many software applications that take this long to come out of beta status. But Wine is not like a typical software program. It faces a mammoth task to hit what is a continuously moving target.
The purpose of this article is to try out some of my favourite Windows multimedia software in Wine. This is not intended to be an exhaustive survey of Windows multimedia software, but merely to capture my thoughts on software which I used on a regular basis under Windows. The first part of the article explores 3 proprietary Windows applications.

Spotify
Spotify is a proprietary peer-to-peer music streaming service that allows users to listen to tracks or albums on demand. The service describes itself as "A world of music. Instant, simple and free". Audio streams are provided in the Vorbis format. Due to licensing issues, Spotify is currently only available to use in the UK, France, Spain, Sweden, Finland and Norway.
Spotify is particulary useful because it provides free legal access to a huge library of music covering all different types of music such as pop, alternative, classical, techno, and rock. It is a great way of dipping into new music. The service has the support of major labels including Sony BMG, EMI, Universal, and Warner Music, as well as independent labels and distribution networks like Labrador Records, The Orchard, Alligator Records, Merlin, CD Baby, INgrooves as well as classical music labels such as Chandos, Naxos, EMI Classic, Warner Classics, Denon Essentials and many more. The breadth of music is expanding at a phenomenal pace. This month alone the service added over 7,500 new albums.
Whilst the premium service requires the payment of a monthly subscription, there is also a free version available which provides the same range of tracks and albums albeit at a lower streaming rate (160kbit/s as opposed to 320kbit/s). The free version also has audio adverts between tracks, and graphical ads within the graphical user interface, but these are not too intrusive.
There are free software clients for Spotify which run on Linux. Unfortunately, they only work with a premium account, and do not provide all of the functionality provided by Spotify's own graphical user interface. Regretfully, the developers of Spotify, Spotify AB, do not provide a Linux client for either the free or premium versions, and appear to have no plans to do so in the future. However, on their website they do at least provide a brief article which explains how to run the Windows version of Spotify in Linux, using Wine.
I am pleased to report that Spotify runs really sweetly under Wine. First, music tracks are played without any audio glitches whatsoever. The interface has no visual bugs, and searches for tracks and albums work exactly as expected. The software has been very stable in use, not crashing on a single occasion, and works without any noticeable speed slowdown. A big thumbs up for Wine here!
Spotify is one of my favourite applications. It is the fastest way of playing music, and allows me to explore a huge range of new music. I would be lost without it!

DigiGuide
Moving on, DigiGuide is a popular television and radio listings program for home computers, produced by GipsyMedia Limited. It is proprietary software which has an annual subscription fee, and runs under Microsoft Windows only.
The main features of DigiGuide include:
  • Minimum of 14 days of TV and Radio listing, but for many channels it provides 4-6 weeks more
  • Automatic downloading and updating of listings
  • Different ways to view listings including on a grid and in single- and multi-channel lists
  • Ability to search listings by programme name, episode name, category and keywords
  • Default and user-created markers for highlighting programmes, series or search results
  • Reminder alerts on screen, by email and by SMS
  • Customizable appearance settings (skins), plus various add-ins and extensions
  • Ability to report listings issues and support via forums and email
Linux has a number of TV guide programs that run natively such as Maxemum TV-Guide, and the Java based FreeGuide. These applications use XMLTV as their back end to grab listings. Unfortunately, the quality of the listings is significantly inferior and covers a shorter period than that provided by DigiGuide. Moreover, DigiGuide has many other advantages, such as being more visually appealing with different ways to view listings, a useful Explorer bar which makes it a breeze to find interesting tv programmes, and the software is hugely configurable.

Whilst GipsyMedia has mooted the idea of releasing a Mac OS X version of DigiGuide, they have repeatedly stated that they have no plans to produce a Linux client.
Fortunately, DigiGuide is easy to install and really works under Wine. In fact it runs just as well as any program that I use regularly (and that is quite a few). I have read reports that there were previously problems with DigiGuide updating its listings with Wine, but I have experienced no problems whatsoever with Wine 1.1.28. The fonts look great under Wine, the software is really slick, and feels like its running natively under Linux. Another pat on the back for the Wine developers.

VideoReDo
VideoReDo is proprietary MPEG video editing software for Windows produced by DRD Systems. It provides a simple and fast way to edit MPEG1 and MPEG2 video, with automatic commercial detection, auto repair audio/video sync, with transport stream mux and demuxing.
One of the key features of VideoReDo Plus is that it edits in native MPEG, making it very quick to trim, cut and/or join MPEGs.
VideoRedo is one of those rare pieces of software where the developer's claim are true: it makes it so simple to cut video from MPEG/VOB files.
In the video editing department I recognise that Linux has strong alternatives. I have read a lot of good things about Avidemux, Kdenlive, and Lives, and in time probably Avidemux will become my video editor of choice. But for now, I am perfectly happy editing with VideoReDo.
Stability of VideReDo under Wine is the biggest issue. In general the software crashes under Wine on a fairly regular basis. Whilst most of the tools run without any problems including the Ad-Detective tool, trying to start the Quickstream fix causes VideoReDo to fall over every time. However, providing the media file does not need to be repaired, it is still possible to use VideReDo under Wine to edit MPEG files. Watching the video in the playback window is unsurprisingly a bit jerky, but then VideReDo was never intended to be a media playback tool. The jerkyness does not prevent the user from locating the parts of the file to edit, and so VideoReDo is functional under Wine.
Whilst it is still possible to use VideoReDo under Wine, it falls significantly short of being a recommended way of editing video files under Linux. At least Linux has real viable alternatives released under freely distributable licenses. But I hope that a later version of Wine will improve matters, as I will always have a soft spot for VideoReDo.

September 5, 2009

Easy way to record Linux desktop movie as gif animation

The Byzanz application lets you record your desktop, a window, or a selected area of the screen as a movie. The resulting file is an animated .gif, so is viewable in almost any web browser ever made. You could attach it to a forum posting if you’re asking for help, for example. The only downside is that the resulting movie file can be large, depending on the area you’ve selected and the length of the movie. Full desktop recordings can easily run in at double-digit megabytes, in fact.

In Ubuntu Hardy, the package can be installed using Synaptic—search for byzanz. Or type the following command in terminal to install Byzanz.

sudo aptitude install byzanz

Once installed, right-click a blank spot on the top panel and select Add to panel. Then select Desktop Recorder from the list. Note that Byzanz won’t work correctly if desktop visual effects are enabled—to disable them, click System —> Preferences —> Appearance, and then click the Visual Effects tab. Then click the None radio button. When you’ve finished recording using Byzanz, repeat, and click the Normal or Extra.

Once the application’s icon appears on the panel, click the small down arrow to select to record the desktop, an area of it, or a particular window. When selecting to record an area of the desktop, the screen will turn black and you should click and drag to de?ne where you want to record (the screen turning black is an unfortunate bug, and you’ll have to try and remember where on the desktop it is you want to record). If you select to record a program window, the mouse will turn to a crosshairs—just click on the window you want to record.

Following this, recording will start. The Byzanz icon will turn to a red circle to indicate this. When you’ve finished, click the red circle to stop recording. You’ll then be prompted to save the movie file.

Bear in mind that resulting movie .gif won’t play in Ubuntu and Linux mint's default image viewer (Eye of GNOME), which will open when you double-click the image. You’ll see nothing but the first frame. Instead, you must play them in Firefox to see the full animation. To do this, right-click the ?le, and select Open With —> Open with “Firefox Web Browser”.

Source ubuntugeek.com

Open Source Photo Processing Comes of Age

People who enjoy digital photography as a creative outlet are very familiar with software products from companies like Adobe, Corel, ACD Systems, Bibble Labs, Light Crafts, and even Google. Most of them are also likely familiar with what until recently was the premier open source photo editor, the Gimp. Unfortunately, the Gimp has lacked a very important feature for a lot of photographers, 16 bit per channel editing. Because of that, most serious photographers do not consider the Gimp a viable alternative. True, there is also Cinepaint, which forked off of the Gimp a few years ago, and it does offer 16 bit per channel editing. Unfortunately, its interface leaves a lot to be desired and does not seem to be heavily maintained.
Happily, there is now another open source alternative with 16 bit mode editing capabilities which appears to be getting ready to give the big guys a run for their money – digiKam. I have personally only recently discovered digiKam. Well, I had tried it before, but only since I tried its KDE4 edition did I think it was ready for my use. I was actually quite surprised to see how much it has improved and how many features have been included with it. Some of its features are:
  • 16 bit per channel support.
  • Curves and levels tools.
  • Color management support.
  • White balance tool with color picker.
  • Lens correction tools.
  • Aspect Ratio Crop tool with several standard formats available.
  • Proper black & white conversion tool.
  • Batch processing.
  • Tagging and searching features.
  • Export to Facebook, Flickr, Picasa, etc.
And there are many, many more that I just don’t have time to even mention. Of course, digiKam is not perfect. And there are a couple of items that I expect to be improved or corrected soon. But, I assure you that if you are into photography, you are going to be hearing a lot more about digiKam in the future and, hopefully, you will be enjoying its use too.
Now, allow me to take you trough a quick tour of what it is like to work in digiKam. I am currently using digiKam version 1.0.0-beta4 as found in PCLinuxOS KDE4 repositories.

RAW Editing

For this tour I decided to use this photo because of its somewhat challenging lighting.
original_raw
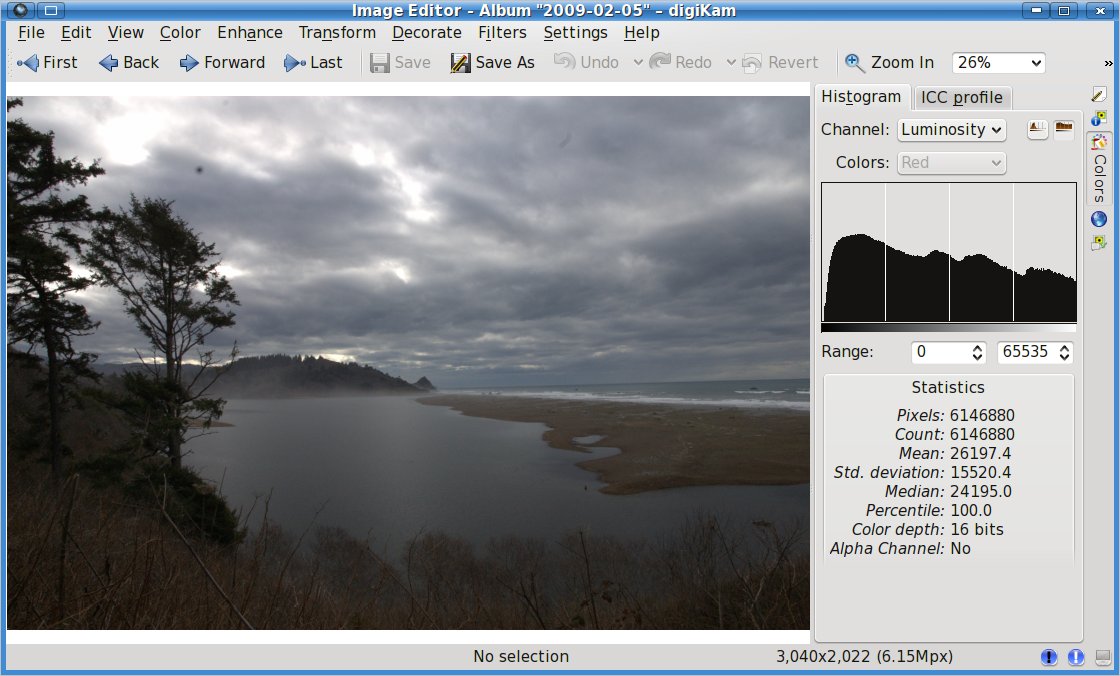
This is a RAW image taken with my old Pentax istDS*. This is how it looks in digiKam’s editor, which by the way exists as a standalone application as well called showFoto.
original_loaded
If you are familiar with histograms, you may have noticed that the histogram on this picture seems rather odd. The reason for that is that digiKam can show two different types of histograms, linear and logarithmic. The one displayed here is the logarithmic histogram, but most people are only accustomed to the linear type. One can switch between histogram types by clicking their respective little buttons above the histogram. Unfortunately, when clicking on the linear histogram button for this image all I get is a flat line. This is what digiKam’s documentation says regarding this:
“for images that contain substantial areas of constant color a linear histogram will often be dominated by a single bar. In this case a logarithmic histogram will often be more useful.”
I am sure there are technical reasons for this, but I do wonder why other programs, like Cinepaint, are able to show a linear histogram for this image just fine. I mention this because I know that some people do rely on the histogram a lot and I do think that the linear type is more useful. But I agree that having the logarithmic histogram is better than nothing. So, since this is not really a show stopper lets move on.
I am by far not a post processing expert. My normal work-flow when editing an image is to edit the levels, adjust the saturation, crop or resize, and then sharpen the image. So, lets try to do that with this image.

Levels

First lets use the levels tool found under Color > Levels Adjust.
01_Levels
I basically just added a bit of contrast by moving the left lever (below the second histogram) to the right and lighten the image by moving the right lever to the left. The preview window adjusts automatically as I make my adjustments so that I know what the result will be.

Saturation

Now, lets increase the saturation to try to bring out the color a little. For that we use the saturation tool found under Color > Hue/Saturation/Lightness.
02_Saturation
I don’t like the “Disney” look that some point and shoot cameras default to with supper saturated colors. I like to keep my images somewhat realistic looking. So I don’t like to bump the saturation too much. I feel that, for this picture, that amount of saturation is just enough to give it a bit of life without going too far into cartoon land.

Cropping

Now I am going to crop the image. This is really an important step if you are planing on printing the image. If you have ever taken your DSLR images to be printed without cropping them first, you may have been unpleasantly surprised by the fact that they were not centered correctly, or that an important part of the image was left out. The reason for this is that the image you gave them did not have the same proportions as the paper you asked them to print it on. And so they had to crop it for you. To prevent that from happening you need to crop your images to the same proportions of the paper you will be printing on. Yes, that means that you will need a different image if you want to print 8×10 than if you want 5×7, 14×20, etc. Fortunately, digiKam makes this step a breeze with its aspect ratio crop tool found under Transform > Aspect Ratio Crop.
03_Crop
As you can see I chose to use the “Golden Ratio” option for this image, but digiKam has predefined settings for all the common printing paper ratios in the market and even allows you to choose a custom ratio if you desire.

Sharpening

The final step in my photo processing work-flow is to sharpen the image. I am used to using the “Unsharp mask” method for this purpose, but in reading digiKam’s documentation I was surprised to learn that they actually recommend the “Refocus” method as a way to obtain better results. This is how the Sharpen tool looks like, found under Enhance > Sharpen.
04_Sharpening
As you can see you can change the sharpening method used with a drop down button. You can zoom in to the image as much as you want using the Zoom button, and you can move the zoom window around in the small preview image above the settings area. I was conservative in the amount of Circular sharpness specified because I could see in the preview area that going for more would result in a lot of grain being visible. This amount improved the sharpness significantly while still retaining the smooth look of the overall image. This is my final result.
Final_Normal
As you can see, there is quite a bit of improvement over what we started with.

Auto-Correction

Normally I would have been content with leaving it at that. But since I am still in the exploring digiKam mode, I decided to test some of the Auto-Correction tools available. To do that, I went back to the original RAW image, and after importing it, I went straight into Color > Auto-Correction. This is what it looks like.
Auto-Correction
As you can see, there are five automatic correction levels that you can choose from to improve your image. In most images that I have tried this with, the Auto Levels option gives the best results. However, in this particular image the result was too dark. I had not seen any image for which the Equalize option resulted in an improvement, but for this particular image the results it gave me were surprisingly good. This is what the digiKam documentation says about the Equalize method of Auto-Correction:
Equalize: this method adjusts the brightness of colors across the selected image so that the histogram for the Value channel is as flat as possible, that is, so that each possible brightness value appears at about the same number of pixels as each other value. Sometimes Equalize works wonderfully at enhancing the contrasts of an image. Other times it gives garbage. It is a very powerful operation, which can either work miracles on a image or destroy it.
Well, looks like they were not kidding. My image turned out much better using this method of correction instead of my normal level adjustment step. This is how the image looks after adding saturation, cropping it, and sharpening it.
Final_Equalized

Conclusion

Without a doubt digiKam has a lot to offer for the photographers among us. Unfortunately, it still has one glaring omission – a clone tool. You may have noticed that the original RAW image had some dust specks in the sky above the trees and in other parts of the clouds. In digiKam, the only tool available for trying to remove such things (other than cropping them out as I did here) is a tool called In-painting, found under Enhance > In-painting. However, that tool is not easy to use and is rather slow. With a proper clone tool, as available in most other photo editors, removing such items only takes a few seconds. The good news is that the digiKam developers have acknowledged this omission as a bug and we can expect to see it implemented in a future version of digiKam. In the mean time we can use the Gimp to take care of these items as a final touch up step.

September 4, 2009

Why Linux does not look like Windows

One interesting remark I read in some comments is that Linux distributions are not successful because they don't look enough like Windows. Apparently if someone completely copied the interface of Windows and slapped that on top of Linux, Windows users would migrate in droves and Microsoft would be bankrupt. Well, not really. Let me explain.

We can nor plagiarize the Windows interface.

A lot of people agree on the fact that Microsoft copied the MacOS interface when creating Windows. Does Windows look exactly like MacOS? Absolutely not, if it did you can bet that Apple's lawyers would quickly have sent cease and desist letters to Redmond. The same is true for Linux: if a distribution copied the Windows interface to the point that users could be confused in believing that the Linux distribution actually was Windows, that distribution would quickly be taken to court. Remember the story of Lindows? In that case it was only a name!

We should not copy the Windows interface.

There are two major reasons why Linux distributions should not blindly copy the Windows interface. First because it not the best interface for everybody. Most people switched to Linux for a reason, usually because they didn't like something with Windows. That may very well be the interface! Even if the Windows interface is very familiar to a lot of people that does not make it the best interface there is!

The second reason is that Linux is different from Windows, so the interface should reflect that. For example in Windows the "Add / Remove program" applet is not very important as it is only used to remove programs. Many people may never bother with it and it is OK to bury it somewhere in the control panel. In Ubuntu the "add / remove program" applet is much more important as it is needed to install new applications and customize your computer to your purpose. As a result it should have a much more important place in the interface.

Delivering a familiar interface.

Some distributions like Linux Mint manage to deliver a very Windows-like interface while remaining true to Linux. The start menu, system tray and windows switchers stay where they are in Windows, but the theme and colors are very different from Windows. This way new Linux users will find their bearings easily, but will never be unaware that they don't use Windows. The start menu has been customized so that the "Add / remove program" applet is much easier to reach to reflect it's bigger role on a Linux system.

The future

There is no doubt that the user interface is one of the most important part of a desktop operating system, and it is one that has been somewhat neglected up to now. Desktop distributions like SUSE and Ubuntu are starting to change this by making usability studies and polishing the look of their desktops. Soon people will maybe not want Linux to copy the Windows interface but the other way around.

September 3, 2009

Ubuntu Related Links

Ubuntu is a community developed, Linux-based operating system that is perfect for laptops, desktops and servers. Whether you use it at home, at school or at work Ubuntu contains all the applications you need - a web browser, presentation, document and spreadsheet software, instant messaging and much more.

Ubuntu is and always will be free of charge. You do not pay any licensing fees. You can download, use and share Ubuntu with your friends, family, school or business for absolutely nothing.

Ubuntu is designed with security in mind. You get free security updates for at least 18 months on the desktop and server. With the Long Term Support (LTS) version you get three years support on the desktop, and five years on the server and there is no extra fee for the LTS version.

I recently helped a friend switch to Ubuntu and he wanted a list of Ubuntu-related links. I compiled the following list for him and thought it might be useful to others.

Ubuntu-related links:
Community Support
GetDeb - Ubuntu Linux
Paid Support
Planet Ubuntu
Psychocats Resources
Report A Problem
ShipIt
The Fridge
Ubuntu
Ubuntu Archives
Ubuntu brainstorm
Ubuntu Documentation
Ubuntu Download
Ubuntu Forums
Ubuntu Hardware Support
Ubuntu News
Ubuntu Spotlight
Ubuntu Training
Ubuntu Tutorials
Ubuntu Wiki
Using APT
What Is Ubuntu?

Extra links useful in Ubuntu:
Gnome Themes
Nautilus Scripts

I'd be happy to make a similar post for other distros if someone would kindly email me a similar list of links.

September 1, 2009

Gain more battery life from your Linux-based laptop with powertop

If your laptop is running Linux you might not be happy with the battery life you are getting. There are numerous reasons for the possible extra drain on your battery. Some of the biggest issues are: Hard drive spin-downs, interrupts, and power management. Figuring out how to make these adjustments to your kernel (or subsystems) to gain a bit of extra battery life would take more time googling than you would probably prefer. Fortunately there is a single application available to take care of this for you. Powertop is one of those tools every user of Linux on a laptop should have installed – especially if your laptop depends primarily on its battery for life.
Powertop was created by Lesswatts.org with the sole purpose of helping users find those programs and/or systems that are using too much power. The end result? More battery life for you to enjoy. Power top is easy to install and use. Powertop is a curses-based application so it is run inside of a terminal very much like the Top application. Don’t expect a fancy GUI here, it’s text-based but still user-friendly. In this article you will find out how to install Powertop and use it to get the most out of your battery.
Installing Powertop
So long as you are using a modern release, you should find Powertop in your distributions’ repositories. And since Powertop is a terminal-based application, I will illustrate how to install via command line.
The steps are simple:
  1. Open up a terminal window.
  2. Issue the command sudo install powertop.
  3. Click ‘y’ to okay the installation.
That’s it. Powertop is now ready for you to use.
Using Powertop
Figure 1
Figure 1
With your terminal still open issue the command sudo powertop to start the application. You can not run Powertop as the standard user because Powertop has to collect and modify information that the standard user has no access to. Fortunately sudo will do the trick.
What you see will differ, depending upon your distribution, installation, configuration, etc.
As you can see ,in Figure 1, Powertop has a few suggestions to aid my laptop. The biggest issue is wakeups and Powertop is giving me the top causes for wakeups.
As you can also see, Powertop offers suggestions to solve the various problems. Not only does Powertop make suggestions, it will offer to take care of the suggestion for you. In the instance above you can see Powertop is suggesting I disable the hal system from polling my CD drive. You can do this with the command:
hal-disable-polling –device /dev/cdrom
or you can just hit the ‘K’ key and Powertop will take care of this for you.
Once you take care of this suggestion (whether you let Powertop take care of it or you do it manually) Powertop will then suggest another way for you get more power from your laptop and will offer to take care of the issue for you. You can continue on like this until Powertop has resolved every issue it can find.
Final thoughts
Powertop is an effective means of helping your laptop gain more battery life without having to recompile a kernel, manually edit a configuration file, or issue any commands (outside of starting the application). After following the suggestions of Powertop you should experience a noticeable difference in your battery life.

August 31, 2009

How To Enable Adobe's Flash Player In Google Chrome (Ubuntu 9.04)

1 Installing Google Chrome

Open Firefox and visit http://dev.chromium.org/getting-involved/dev-channel. Scroll down to the Linux section and pick the right .deb package for your architecture (google-chrome-unstable_current_i386.deb or google-chrome-unstable_current_amd64.deb):

Click on the Accept and download button to accept the Google Chrome Terms of Service and to start the download:

In the Firefox download dialogue, select Open with GDebi Package Installer (default):

Click to enlarge

A Package Installer window opens. Click on Install Package to start the Google Chrome installation:

Type in your password:

Click to enlarge

Afterwards Google Chrome is being installed:

Click to enlarge

Click on Close to leave the Package Installer after installation has finished:

August 30, 2009

Four More Cool Word Processors

If you've seen one online word processor--or even a handful of them--you haven't seen them all, not by a longshot. In addition to Google Docs, Zoho Writer, and emerging competitors such as EtherPad, other online offerings you might want to try include AjaxWrite, Writeboard, picoWrite and MonkeyTeX, to name a few.

As we've talked about in previous articles, online word processors can provide certain advantages as alternatives to Microsoft Word over non-Web-enabled counterparts like OpenOffice.org and Sun's StarOffice.

To sum up quite quickly, because online word processors are browser-based, they can often operate easily on just about any PC running just about any operating system (OS), including Linux. Generally but with some exceptions, documents can be stored either online or on your own machine, and they can be shared collaboratively regardless of which OS your friends and colleagues are using.

AjaxWrite drew a lot of fanfare on its initial rollout way back in 2006. The other offerings we'll explore in today's article are newer, and lean very strongly in collaborative directions. Writeboard is one of the easiest-to-use collaborative writing and editing environments you're likely to find anywhere.

The now emerging picoWrite, on the other hand, emphasizes rich functionality, through features ranging from multicolumn text layouts to serverless doc sharing. For its part, MonkeyTeX is tightly focused on simplifying (and even teaching about) implementation of LaTeX, a document prep system tailored to pulling together scientific and academic reports.

Yet much as in the word processing software arena, the online offerings are in various stages of their respective life cycles. picoWrite is now in private alpha testing, with a public beta release not slated until the end of this year. Writeboard and MonkeyTeX are both already available, while still in the process of ongoing development.

Writeboard

Unlike EtherPad, a collaborative environment now under way by ex-Google staffers, Writeboard is entirely free of charge. Produced by 37signals--the makers of Backpack and several other crossplatform Web 2.0 applications--Writeboard is “guaranteed compatible” with the Firefox, Safari, and Internet Explorer (IE) 6.0 browsers. But it won't function with IE 5.0, and “may or may not work” with other browsers, according to information on the Writeboard site.

To get started on creating a document, all you need to do is assign a name to your own “writeboard,” give it a password, and type in your e-mail address for ID purposes. If you'd like to share your writeboard with others, just enter their e-mail addresses, and they'll be sent a link to the writeboard, along with the document password.

Writeboard does lack certain features you'll find in some other online word processors, such as color-coding by author. You can't import text from an external source, either, although you can cut-and-paste text from outside. But Writeboard is especially adept at versioning.

Each time you (or one of your collaborators) makes an edit, a new version gets added to the sidebar. You can conjure up a visual comparison between two different versions by first clicking on the versions you want, and then clicking on a “compare” button.

Everything that's been deleted will be grey and struckthrough, while everything newly added will show up in green.

AjaxWrite

AjaxWrite was the brainchild of Michael Robertson, a developer who had previously challenged Vonage and Skype with his work on SIPphone and Gizmo Project. Upon initial launch three years ago, AjaxWrite was widely hailed as a possible eventual replacement for MS Word. But now as then, the program is a lot leaner and less capable than the nemesis from Microsoft.

A spellchecker planned at the outset has never been implemented in AjaxWrite. The find/replace function is similarly greyed out. Moreover, AjaxWrite still works only with Firefox, despite initial intentions to expand support to other browsers.

Yet AjaxWrite does remain a handy online alternative for basic word processing tasks on either Linux, Windows, or Mac OS X.

AjaxWrite is free, and you don't even need to register to use it. You can import and export documents in popular formats, including PDF and Microsoft's .DOC. You can save your work to your computers, and you can highlight word and phrases with bolding, italics, and underlining.

You can change font colors and sizes, too, although AjaxWrite currently provides only about 17 built-in font styles.

AjaxWrite is now part of a suite which also includes AjaxSketch, AjaxTunes, and the AjaxXLS spreadsheet.

picoWrite

picoWrite is a new designate for supplying full MS Word-like functionality online. Although this Web-based offering is still in alpha, its creators envision what-you-see-is what-you-get (WYSIWYG) functionality with “pixel-true” rendering in the final product.

Advanced word processing features are also in the works, including multi-column text layout, zoom, footnotes, undo/redo, and online/offline functionality with Google Gears support.

picoWrite is one component in an online suite now under development by Tom Wies, a professor at the University of Dusseldorf in Germany who formerly worked on projects with KDE and Trolltech.

The forthcoming picoScribe suite will run on far more than just Firefox, according to Eric Hellmich, who heads up the German-based company behind picoScribe. Support is also planned for Safari, Opera, Internet Explorer, the iPhone browser, and ultimately, Google's Chrome.

picoWrite will also carry a few other twists of its own, Hellmich said in an interview. Although Web server-based collaboration will be supported, too, serverless collaboration will be furnished through P2P.

Also, through close integration with picoCalc, picoScribe's spreadsheet, you'll be able to embed spreadsheets into your word processing docs, a feature which Hellmich views as particularly useful in invoicing, for example.

An online presentation package dubbed picoShow is underway, as well. And Hellmich is looking to eventually add document management capabilities, along with an online application for managing mathematical formulas.

MonkeyTeX

Much like James Allen's ScribTex, Precipice Technologies' MonkeyTeX lets you work online with LaTeX, a macro-based document preparation language designed for consistent formatting. MonkeyTeX, however, is distinguished by the educational slant it takes to LaTeX.

On the MonkeyTeX Web site, you can upload, create, and perform crossplatform sharing of LaTeX files. You can also convert them to PDFs. If you're collaborating on LaTeX documents with colleagues and co-workers, you can view changes to documents as they're being made.

But MonkeyTeX also includes both a “LaTeX Tutorial” and “LaTeX Cheatsheet” in its online help section. Moreover, if you inadvertently break a LaTeX rule, an error message is likely to spring up, trying to explain to you just what went wrong.

MonkeyTex offers a particularly elegant and uncluttered user interface (UI), too. BibTeX is supported for bibliographical references, and an application programming interface (API) recently saw the light of day.

MonkeyTeX is free. Registration is required, but all you have to do is supply your e-mail address and create a password for gaining entrance to this collaborative Web site.

Around the Corner

In a future article, we'll consider a few other online word processors geared to across Linux and other OS, including Peepel WebWriter, FlyWord, and JDarkRoom.

7 Reasons to Use Debian


1. Stable
Any application needs time to be used and tested enough time in order to make it stable. One of the greatest goals of Debian is stability. It's released when it's ready and applications included in the repositories have enough time to be tested through.

2. Debian offers stable, old stable, testing, *and* sid
Why should this be an advantage? First, because there is a stable release, which will fit both desktops and servers. Since Debian stable releases happen rarely, software can get a little old. So any can get to choose 'testing', which is tagged that way because applications are tested more but they are still usable. Sid is bleeding edge, which means applications get in usually as soon as they are released, so you get the newest software only by installing a testing weekly snapshot and upgrading. Considering the stable and old stable offer software which has been tested and stripped for critical bugs, testing usually proves to be the perfect alternative for a user who wants to use up-to-date tools and applications, which include the latest features.

3. The DFSG
Maybe this doesn't say much just when you see it, but Debian has been around since 1993 and it still is as it was. Although the social contract changed a little over the years, it still retained it's originality. It's open, it's free, it follows the GPL entirely, it respects the community needs.

4. Debian is one of the oldest distributions
Although this doesn't necessarily make you wise, take a look at Debian: it's been up for over 15 years and there are a lot of distributions out there who take and eventually expand Debian's work, take Ubuntu or DSL for example.

5. Very rich documenation
Except for the official documentation, there are hundreds of respectable websites which provide Debian tutorials and general documentation. There is usually no problem which can't be solved in Debian or at least which hasn't somewhere an answer.

6. Many distributions are based on Debian
Debian offers a solid base and a powerful system of managing software. Distributions like Ubuntu and DSL use the APT packaging system, which was invented by Debian for easier management of installed software. In turn, everything user-friendly or useful from Ubuntu will get eventually into Debian.

7. Great community
Being one of the oldest distributions out there, Debian has a strong community. Take the IRC channels, both on Freenode and OFTC, take all the Debian-dedicated forums or the mailing lists, consider that there are gurus out there who worked with Debian for years and they will usually offer support and share knowledge.

August 29, 2009

TV Time - Linux Software

tvtime is a high quality television application for use with video capture cards on Linux systems. tvtime processes the input from a capture card and displays it on a computer monitor or projector.
tvtime screenshot
Packages of tvtime are included in many major Linux distributions, including Debian, Fedora, Gentoo, and SuSE. You may want to check with your distribution to see if packages are available.

Source code releases

  1. tvtime 1.0.1 (8 September 2005)
  2. tvtime 0.99 (19 April 2005)
  3. tvtime 0.9.15 (30 October 2004)
  4. tvtime 0.9.12 (22 November 2003)

August 28, 2009

How to Fix Wireless on Ubuntu

Wireless on Linux is a perennial embarrassment. Although the situation has improved immensely since a few years ago, the inability to get wireless cards working acceptably often tops the list of user frustrations. Here’s an outline of what’s wrong with Ubuntu’s approach to wireless drivers, and how to fix it.

Until a few weeks ago, I had the luxury of a wired network connection to plug my computer into. It was great–no passphrases to keep track of, no interference from the neighbors’ networks and no crashing wireless drivers. Then I moved, and now have to use my wireless card to get online. Although I have a chipset manufactured by Atheros, one of the most Linux-friendly vendors around, my connection is a mess, tending to drop under heavy load and requiring several minutes to negotiate a WPA handshake.

To be fair, Ubuntu, and Linux more generally, have come a long way on the wireless front in the last few years. More and more wireless cards are now truly plug-and-play, and ndiswrapper is becoming a thing of the past. But there’s a lot of room left for improvement.

Find stable code and stick with it

Perhaps the greatest problem with Ubuntu’s approach to wireless is the ever-changing code of its wireless stack. With compat-wireless, from which most of Ubuntu’s drivers come, in constant development, users receive different drivers each time the kernel is updated. Although the updates sometimes fix problems, they also tend to cause regressions on systems that already work.

Rather than striving to deliver the latest and greatest upstream code, Ubuntu packagers should focus on finding snapshots of the wireless stack that work the best, and stick with them. This might make the Ubuntu kernel team’s job a little more complicated, since it would mean diverging more from the upstream kernel, but it would be well worth the effort.

Put stability first

Advanced wireless features, like AP-mode and injection support, are nice, but they should take a back seat to normal managed-mode connections, which are what 99% of Ubuntu users are interested in. The blame here lies with upstream developers more than Ubuntu’s packagers, but someone needs to make sure the ability to connect reliably to normal wireless routers isn’t compromised in the interests of geeks who need fancy features to crack their neighbors’ WEP keys.

My ath5k driver can inject hundreds of packets per second without breaking a sweat, yet it can’t hold a managed-mode connection for more than a few hours before it begins spewing cryptic error messages into the system log and eventually crashes. Clearly, priorities need to be rearranged.

Simplify wireless infrastructure

Ubuntu’s wireless infrastucture needs to be cleaned up. For some chipsets, Ubuntu ships more than one driver–ath5k/ath9k vs. ath_pci, for example–and telling the system which one to use is complicated even for advanced users. Similarly, the module dependencies related to some parts of the wireless subsystem are a mess–the inability to use b44-based ethernet cards without also having the b43 wireless driver loaded is a prominent example.

Wireless networking is complicated by nature, but that doesn’t mean Ubuntu shouldn’t try to simplify it for end users. Making Jockey (a.k.a. “Hardware Drivers”) work reliably would be a good first step. Avoiding redundancy in wireless modules and cleaning up the dirty hacks that work around driver dependencies would be a great addition.

Giving upLink

After recompiling drivers and kernels, replacing NetworkManager with wicd and managing my connection from the command line, all to no effect, I remained so dissatisfied with my Ubuntu wireless experience that I decided it would be easier to buy a cheap router to place next to my computer, flash it with DD-WRT and configure it as a repeater so I can use Ethernet to get online without dealing with my wireless card. Problem solved, but at considerable expense in time and money. If my Ubuntu wireless drivers had just worked to begin with, I’d have been a much happier user.

If Ubuntu wants to attract and keep the masses, it needs to continue to devote resources to smoothing over wireless issues. It may have come far in the last few years, but there’s a long way yet to go.

August 27, 2009

Ubuntu 9.10 vs. Mac OS X Snow Leopard vs. Windows 7

Over a short period of time, three major operating system releases will take place. From Apple, Mac OS X 10.6 (also known as Snow Leopard) will ship on August 28,2009. From Microsoft, Windows 7 has already been released to manufacturers, with general retail availability set for October of this year. Representing Linux, Ubuntu 9.10 (Karmic Koala) is also slated for an October 2009 release. So, there are a lot of reasons for us to be excited.

Since I use Mac OS X (dual boot with Xubuntu) on Macbook Pro, Ubuntu on my main workstation, and Windows XP on some of our computers used on our family business, I'm looking forward to these consecutive "big-time" updates. However, I still haven't made up my mind if I'll immediately upgrade to the new versions. But I did a little research and collected some important information so that I could somehow find out early on if the upgrades will be worth it.

For all of you, I'm going to highlight the main features of Ubuntu 9.10, Mac OS X Snow Leopard, and Windows 7. I will also share my quick observation later on.


Mac OS X v10.6 (Snow Leopard)

* UI (User Interface) Enhancements:
- Stacks will allow viewing a subfolder without launching Finder. Stacks have also been modified to include scroll-bars for folders with many files;
- Contextual menus which come out of Dock icons now have more options and have a new look, with a semi-transparent charcoal background and white type;
- Exposé can now display all windows for a single program by left clicking and holding its icon in the dock;
- More reliable, higher-resolution iChat;

* System Enhancements:
- Faster installation, startup, shutdown, Time Machine backup and connection establishment;
- Smaller footprint compared to previous version (7GB of disk space will be freed);
- 64-bit support with nearly all system applications built with 64-bit code;
- New technologies introduced to enhance the performance of multiple processor cores and graphics processing units;

* Additional Features:
- New version of Quicktime;
- Out-of-the-box support for Microsoft Exchange;
- Automatic updates for printer drivers;

A complete list of features can be found HERE.


The main focus on this release is obviously on improving performance and efficiency on utilizing key system resources, rather than adding new end-user features.


Windows 7

* UI (User Interface) Enhancements:
- A redesigned Windows Shell with a new taskbar;
- A new control panel interface;
- Windows Explorer now includes a desktop slideshow that changes the desktop background in a designated amount of time;
- Start menu and window management enhancements;
- The user interface for font management has been overhauled;

* System Enhancements:
- Faster boot speed;
- The DirectX version has been updated to 11;
- Multi-touch support for Tablet PCs and other capable devices;
- Native WWAN support, similar to native WiFi added in Vista;
- Enhanced security features;

* Additional Features:
- Calculator has been rewritten, with multiline capabilities including Programmer and Statistics modes along with unit conversion and date calculation;
- Office Open XML and ODF support in WordPad;
- Windows 7 will include Windows Media Player 12, along with new codecs for playing formats such as H.264, MPEG4-SP, ASP/Divx/Xvid, MJPEG, DV, Advanced Audio Coding (AAC-LC), AA;
- Windows XP Mode;

A more complete list of features can be found HERE.


Windows 7 is like a striped-down version of Vista but few key enhancements are added here and there. --Hardware and applications that are compatible with Vista will be fully compatible with Windows 7. In addition, overall performance improvements are also expected.


Ubuntu 9.10 (Karmic Koala)

* UI (User Interface) Enhancements:
- Overall theme refresh;
- Using the most up-to-date GNOME version;
- A redesigned login manager;

* System Enhancements:
- Faster boot speed;
- Ext4 will be the default fileystem;
- Ubuntu One client will be installed by default;

* Additional Features:
- Empathy Instant Messenger will replace Pidgin;
- Will utilize GRUB 2 as its default boot loader;


Since Ubuntu 9.10 is still in the early stages of development, a lot of changes can still happen as some features may still be added or removed. I can only give more and accurate information when the release date approaches. However, you can take a peek at what's cooking HERE.


I've noticed that Windows and Mac OS X is trying to be like Linux right now --fast and resource efficient. On the other hand, Linux on the desktop is still polishing its user-interface perhaps to be like Windows or Mac OS X. Although I now absolutely prefer Linux for its overall features, my geeky side still tells to me to check out Snow Leopard and Windows 7. Hopefully, I can share the complete experience with all of you here soon.